
Pruning
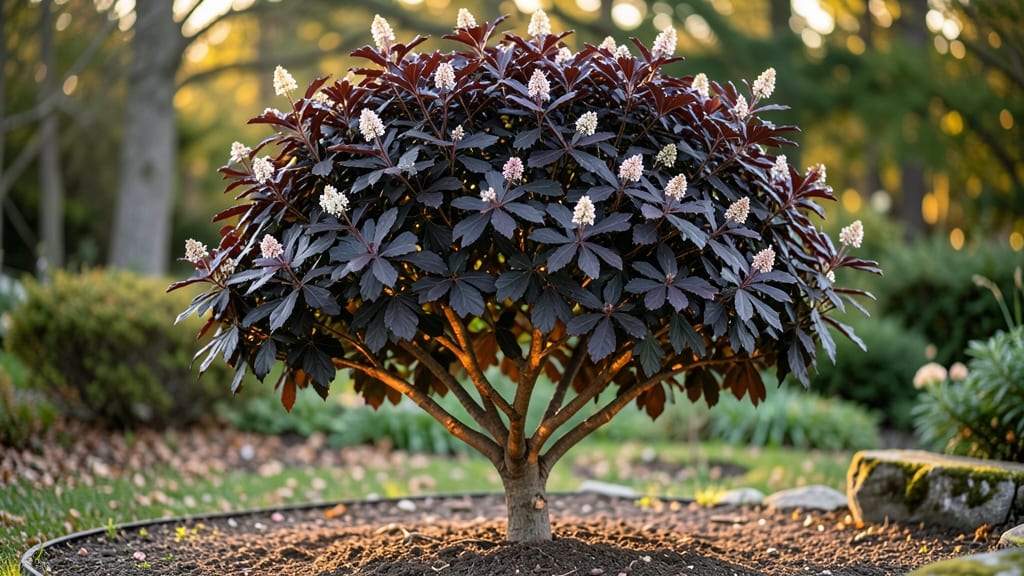
Creating a tree-form ninebark with those perfect horizontal layers feels like sculpting with living branches. 🌿 I spent years struggling with my first ninebark—it grew too leggy, lost its shape, and never developed those signature tiers. Then I discovered the pruning rhythm that transforms it into a stunning, multi-layered specimen.
The secret lies in strategic cuts during late winter or early spring, before new growth begins. You'll shape the central leader first, then encourage strong lateral branches to form your layers.
Most gardeners overlook the importance of spacing cuts properly—too aggressive, and you stunt growth; too gentle, and you lose the tiered effect. By summer's end, you'll see those lush, layered branches filling out beautifully, with vibrant foliage that stays stunning well into fall.
The plant rewards patience with bold, textured growth that anchors any landscape design. Works equally well as a standalone specimen or in mixed borders. Here's how to get those perfect layers without the guesswork—my exact pruning schedule included.
📚 In This Guide
- What you need
- Instructions
- Tips and common mistakes
- Wrapping up and next steps
What you need
- ● Pruning shears: Sharp, bypass-style shears (for clean cuts on branches up to ½ inch thick). Example: Fiskars PowerGear or Felco F-2.
- ● Loppers: For branches ½ to 1½ inches thick. Look for: Ratcheting or bypass loppers with a 6–8-inch cutting blade.
- ● Pruning saw: For thicker branches (1½+ inches). Recommended: Curved-tooth saw for clean cuts.
- ● Disinfectant: 70% isopropyl alcohol or a pruning sealant (to prevent disease spread).
- ● Gloves: Heavy-duty, cut-resistant gloves (e.g., Mechanix or garden-specific brands).
- ● Safety glasses: To protect against debris.
- ● Rake or broom: For clearing fallen leaves/debris post-pruning.
- ● Water & small spray bottle: To hydrate cuts and reduce stress on the plant.
- ● Pruning paint: For sealing larger cuts (e.g., TreeHelp Wound Pruning Seal).
- ● Extension pole: For high branches (attach shears/loppers for reach).
- ● Notebook & pen: To sketch your ninebark’s structure before pruning.
- ● Mulch: Organic mulch (e.g., shredded bark) to protect roots post-pruning.
- ● Choose a dry, overcast day to minimize plant stress.
- ● Work when the ninebark is dormant (late winter/early spring) or right after flowering.
- ● Wear long sleeves and pants to avoid scratches from thorns.
Step-by-step guide to pruning ninebark for a perfect tree form
Here's how I transform ninebark into a stunning, layered tree—every cut brings it closer to that "wow" moment.
✂️ Step 1: Prune for a Central Leader and Primary Branches
Start by selecting your central leader—the strongest, straightest upright stem. Remove any competing vertical stems at the base, cutting them back to a bud facing outward. You're shaping the future trunk right now, so be decisive. I like to make these cuts on a dry day when the plant isn't actively growing—this minimizes stress.
Next, identify 3-5 primary scaffold branches spaced evenly around the trunk. These should emerge at 45-degree angles and be spaced 6-12 inches apart vertically. If you don't have enough natural branches, wait until spring to encourage new growth by making a small cut just above a dormant bud. The goal is to create that perfect tiered look—think of a wedding cake, but with foliage.
🌿 Step 2: Develop Secondary and Tertiary Layers
Once your primary branches are established, focus on secondary branches that will create your first layer. These should be half the length of your primary branches and spaced 8-10 inches apart along each scaffold. Cut back any branches that grow inward or cross each other—these will rub and create wounds. I always step back to visualize the layers: your eye should see clear horizontal tiers, not a chaotic mess.
For tertiary layers, work with smaller branches that will fill in the gaps between your primary and secondary branches. These should be no longer than 6 inches and spaced 6 inches apart. Prune back any branches that grow straight up—they'll compete with your central leader. The key here is patience: these smaller branches will thicken and fill out over time, creating that lush, layered look.
☀️ Step 3: Thin Out for Light Penetration and Airflow
Now it's time to thin out the interior of the plant to ensure light penetrates to the center and air circulates freely. Remove any branches that grow directly into the center of the plant—these will create a dense, shaded interior that's prone to disease. You're aiming for a 30-40% reduction in interior foliage, so don't be shy with your pruners. I like to work from the inside out, gradually opening up the plant like unfolding a flower.
Pay special attention to water sprouts—those fast-growing, vertical shoots that pop up between branches. These are energy vampires, sucking resources from your carefully crafted structure. Cut them back to a bud or lateral branch as soon as you spot them. This step is where your ninebark goes from "just another shrub" to a showstopping tree form.
⏰ Step 4: Refine and Maintain Year-Round
After your initial pruning, keep an eye out for new growth that disrupts your layers. In late winter or early spring, before the plant breaks dormancy, do a light cleanup to remove any branches that grew out of place over the winter. This is also the time to shape any uneven layers—a few strategic cuts can make all the difference. I always carry a pair of sharp pruners with me during the growing season; a quick trim here and there keeps things tidy.
In summer, if you notice any branches growing too vigorously or losing their shape, prune back by 1/3 to encourage bushier growth. Avoid heavy pruning in summer, though—it stresses the plant and can lead to weak, leggy growth. Instead, focus on maintaining the balance you've created. The goal is to keep your ninebark looking like a natural masterpiece, not a hastily trimmed hedge.
Tips & tricks for perfect tree form ninebark
Transforming ninebark into a stunning tree form takes precision—and these pro tips will help you nail every detail.
Visualize Your Layers First: Before making any cuts, step back and study your plant's natural structure. In Step 1, sketch a rough outline of your desired tree form on paper—this helps you visualize how the 3-5 primary branches should be spaced at 45-degree angles. I swear by this trick: it prevents that "what was I thinking?" moment when you realize a branch is in the wrong place. Think of it like designing a tiered cake—each layer should be clearly defined and balanced.
The 45-Degree Rule is Non-Negotiable: When selecting primary branches in Step 1, insist on that 45-degree angle—it's what gives ninebark its natural, elegant look. If you can't find a branch at that perfect angle, don't force it. Instead, make a small cut just above a dormant bud in spring to encourage new growth in the right direction. This patience pays off in the long run with a structure that looks effortlessly natural.
Prune Water Sprouts Religiously: In Step 3, when thinning out the interior, treat water sprouts like weeds—they're the enemy of your perfect tree form. These fast-growing vertical shoots steal energy from your carefully crafted structure. Cut them back to a bud or lateral branch immediately, and repeat this every time you see them. I've seen ninebarks go from stunning to shabby in just one growing season because of neglected water sprouts.
Seasonal Timing Matters: The instructions mention pruning in late winter/early spring and summer, but here's the secret: dormant season is your best friend. Pruning when the plant is dormant (late winter) minimizes stress and bleeding. In Step 4, that light cleanup before dormancy break is crucial—it sets you up for perfect growth all season. Avoid heavy pruning in summer; instead, focus on maintaining balance with strategic cuts to encourage bushier growth.
Pro Tips for Tree Form Ninebark
- Transforming ninebark into a stunning tree form takes precision—and these pro tips will help you nail every detail.
- Visualize Your Layers First: Before making any cuts, step back and study your plant's natural structure.
- The 45-Degree Rule is Non-Negotiable: When selecting primary branches in Step 1, insist on that 45-degree angle—it's what gives ninebark its natural, elegant look.
Frequently asked questions
Got questions about growing and shaping tree-form ninebark? You’re not alone!
Here are some of the most common queries—plus quick answers to keep your shrub thriving.
When is the best time to prune tree-form ninebark for shaping?
Prune your tree-form ninebark late winter to early spring (just before new growth starts) for the cleanest results. Avoid heavy pruning in fall—it can stimulate tender growth that may not survive winter. Light shaping in summer is fine, but avoid cutting back more than ⅓ of the plant at once.
How do I encourage a fuller, bushier tree-form ninebark?
Focus on selective pruning to promote density. Trim back 1-2 older stems each year to encourage new growth from the base. Thin out overcrowded branches inside the plant to improve airflow. Fertilize lightly in spring with a balanced formula (10-10-10) to support vigorous regrowth.
Can I turn a standard ninebark shrub into a tree form?
Yes! Start by selecting 3-5 strong, upright stems to form your trunk. Remove all other growth at the base. Over time, prune to maintain a single trunk with layered branches. It may take 2-3 years, but patience pays off! Use stakes to support the young trunk if needed.
Why is my tree-form ninebark losing leaves or looking leggy?
Leggy growth often signals too much shade or over-pruning. Move it to 6+ hours of sunlight daily and prune back only 10-15% of the plant per year. If leaves are sparse, check for pests (like spider mites) or nutrient deficiencies—apply a slow-release fertilizer if soil is poor.
Are there dwarf or compact ninebark varieties for small spaces?
Consider these space-saving options:
- ‘Diablo’: Compact (4-5’ tall), deep purple foliage, and thornless.
- ‘Little Devil’: Dwarf (3-4’ tall), great for containers or tight borders.
- ‘Columnare’: Narrow, upright form (6-8’ tall, 3’ wide)—perfect for vertical gardens.
Wrapping up and next steps
Transforming your tree form ninebark into a stunning, layered masterpiece is totally within reach—with the right pruning know-how! 🌿 By mastering the 5-step pruning guide, you’ve unlocked the secrets to healthy growth, vibrant blooms, and that coveted tiered silhouette.
Remember: patience and precision are your best tools, and even small adjustments can yield big rewards.
Ready to take the next step? Grab your pruners and schedule a maintenance session—whether it’s trimming back winter growth or shaping those lower branches. And if you’re feeling ambitious, why not experiment with a small section first to perfect your technique?
Your ninebark’s future as a garden showstopper starts with one confident cut at a time! ✂️✨