
Pruning
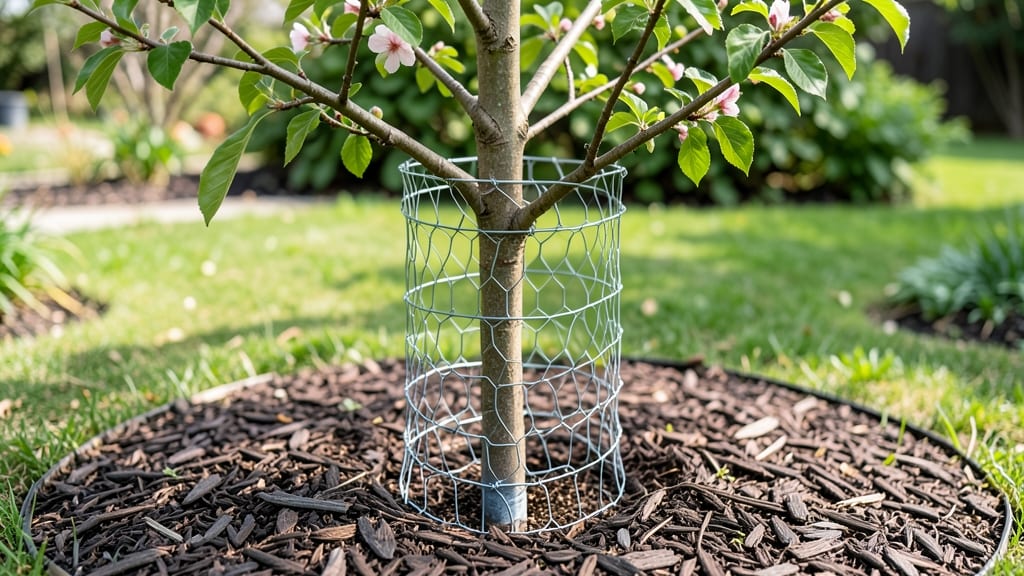
A mesh tree guard saves young trees from deer, rabbits, and rodents that would otherwise turn your saplings into snack bars. 🌱 I learned this the hard way when my newly planted dogwood became a deer buffet overnight—until I wrapped it in heavy-duty mesh.
The guard doesn't just protect; it lets rain and air reach the trunk while keeping critters out. You'll need 20-gauge hardware cloth (the heavier, the better) and a few hours on a calm day.
Measure your tree's trunk circumference and height, then cut the mesh to wrap snugly—overlapping seams by 6 inches to block even the sneakiest nibblers. Secure with staples or zip ties every 12 inches, but avoid piercing the bark. The payoff?
Trees grow stronger and straighter without girdling damage, and you skip the heartbreak of watching them get stripped. I've seen guards last 5-7 years with proper care—just check annually for tears and tighten if the trunk expands.
Works for any young tree facing wildlife threats, from urban sidewalks to rural orchards. Here's how to do it right the first time.
📚 In This Guide
- What you need
- Instructions
- Tips and common mistakes
- Wrapping up and next steps
What you need
- ● Hardware cloth or mesh: 1 roll of 1/4-inch (6mm) or 1/2-inch (12mm) galvanized or stainless steel mesh (at least 6 feet tall and 3-4 feet wide, depending on tree size). Galvanized resists rust, while stainless steel lasts longer but costs more.
- ● Measuring tape: A 10-foot tape measure for accurate sizing.
- ● Scissors or heavy-duty wire cutters: For trimming mesh cleanly.
- ● Staple gun + staples: A high-capacity stapler (e.g., Bostitch or Arrow) and 1/4-inch galvanized staples to secure the mesh.
- ● Wooden stakes or rebar: 4-6 pieces, 2-3 feet long, to anchor the guard.
- ● Hammer or mallet: For driving stakes into the ground.
- ● Twine or zip ties: 10-15 feet of heavy-duty twine or plastic zip ties to reinforce seams.
- ○ PVC pipes or plastic tubing: 2-4 sections (optional for a pre-fabricated cylinder base before wrapping mesh).
- ● Tree guard adhesive: A non-toxic, waterproof sealant (e.g., Tanglefoot Tree Collar) to smooth edges and deter pests.
- ● Reflective tape: 1-2 feet to scare off deer or rabbits (if local wildlife is a concern).
- ● Gloves: Heavy-duty work gloves to protect hands from sharp mesh edges.
Step-by-Step guide to installing a mesh tree guard
Here’s how to shield your young trees from hungry pests without harming wildlife or the tree itself.
🪴 Step 1: Measure and Cut the Mesh Guard to Fit
Start by measuring the trunk of your tree at its widest point—this is where the guard will sit. Use a tape measure to note the circumference, then add 2 inches for overlap at the top and bottom. Cut the mesh guard to this length using heavy-duty scissors or a utility knife. I like to leave the edges slightly frayed; this makes it easier to fold and secure later.
If your tree has branches near the base, cut the guard 4-6 inches above the lowest branch to avoid rubbing against it. A snug fit prevents pests from slipping underneath. Pro tip: Mark the cut line with a marker before cutting—mesh can shift while measuring.
🌿 Step 2: Position the Guard Around the Trunk
Wrap the mesh guard around the trunk, overlapping the edges by 1-2 inches at the sides. The guard should sit 6-12 inches from the ground—low enough to deter rabbits and voles but high enough to keep out curious squirrels. Press the bottom edge firmly into the soil to block entry from below. If the guard feels loose, tuck the bottom into a shallow trench or secure it with landscape staples.
For trees with rough bark, smooth out any wrinkles in the mesh to prevent snags that pests could use to climb over. If the guard feels too tight, loosen it slightly—you want it snug but not crushing the trunk. Real talk: A guard that’s too tight can girdle the tree as it grows.
✂️ Step 3: Secure the Guard with Non-Metallic Fasteners
Use plastic tree ties, zip ties, or landscape staples to fasten the overlapping edges at the top and sides. Space fasteners every 6-8 inches to keep the mesh taut without digging into the bark. Avoid metal staples—they can rust and damage the tree over time. I prefer wide, flat plastic ties because they’re easy to adjust as the trunk grows.
Check the tension occasionally—if the guard sags, pests can crawl underneath. For extra security, fold the top edge downward 1-2 inches to create a lip that deters climbing animals. This simple fold adds another barrier without extra materials.
💧 Step 4: Monitor and Adjust as the Tree Grows
Inspect the guard every 2-3 weeks for tears, gaps, or signs of pest activity (like chewed edges). If you spot damage, reinforce it immediately with additional fasteners or a patch of mesh. As the tree grows, the guard may become loose—add 1-2 extra fasteners or extend the guard upward by 4-6 inches to maintain coverage.
Remove the guard once the trunk reaches 3-4 inches in diameter, or when the bark hardens enough to deter pests (usually after 2-3 years). Leaving it on too long can restrict airflow and trap moisture, leading to rot. Here’s the thing—if you notice sap oozing at the guard’s edges, it’s a sign the mesh is too tight or the tree is stressed.
☀️ Step 5: Maintain the Guard’s Effectiveness Year-Round
Clean the guard once a month by brushing off debris and checking for mold or mildew. A damp cloth works well for stubborn grime. If the mesh becomes clogged with dirt, pests like mice may use it as nesting material. Trim back any low-hanging branches that could provide a bridge over the guard—even a small branch can turn into a pest highway.
In winter, add a 1-inch layer of mulch at the base of the tree to discourage burrowing animals. Just don’t pile it against the trunk—keep it 3-4 inches away to prevent moisture buildup. A well-maintained guard can last 3-5 years, but replace it if it becomes brittle or develops large holes.
Tips & tricks for perfect mesh tree guard installation
Here's what nobody tells you—these small tweaks make all the difference between a guard that works and one that fails.
Precision Cutting: When measuring your tree's circumference in Step 1, add those extra 2 inches for overlap, but don't overdo it. I've seen people cut guards that are too long, making them sag like a hammock. The key is to cut just enough to allow for that 1-2 inch overlap at the sides while still maintaining tension. For trees with uneven trunks, measure at the widest point and the narrowest point, then average them—this prevents gaps where pests could sneak in.
Bark Protection: In Step 2, when positioning the guard, pay special attention to rough bark textures. Smooth out any wrinkles in the mesh that could create snags for climbing pests. I learned this the hard way after watching squirrels use the rough edges as handholds. For extra protection, wrap a thin layer of landscape fabric between the mesh and the bark if you notice any irritation developing. The guard should feel snug but never constricting—think of it like a cozy but not tight sweater for your tree.
Fastener Strategy: Step 3's plastic tree ties are your best friend, but here's the secret: use them in a crisscross pattern rather than just along the sides. This creates a more secure barrier that's harder for determined pests to chew through. Space those fasteners every 6-8 inches as directed, but add an extra one at the very top where climbing animals might try to gain leverage. For larger trees, consider adding a second row of fasteners about halfway up the guard—this creates a double barrier that's nearly impenetrable.
Seasonal Adjustments: The maintenance in Step 5 is where most people drop the ball. That monthly cleaning isn't just about aesthetics—it's about pest prevention. I've seen guards become mouse condos when they're not cleaned regularly. In winter, that 1-inch layer of mulch is crucial, but don't forget to check for any gaps where the guard meets the soil. Pests are crafty and will exploit any opportunity, even a tiny space between the guard and the ground.
Pro Tips for Mesh Tree Guard
- Here's what nobody tells you—these small tweaks make all the difference between a guard that works and one that fails.
- Precision Cutting: When measuring your tree's circumference in Step 1, add those extra 2 inches for overlap, but don't overdo it.
- Bark Protection: In Step 2, when positioning the guard, pay special attention to rough bark textures.
Frequently asked questions
Got questions about mesh tree guards? You’re not alone! Here are some of the most common concerns—and straightforward answers—to help you protect your young trees like a pro.
What’s the best time of year to install a mesh tree guard?
Aim to install your guard before pests like rabbits, deer, or rodents become active—typically in early spring (March–April) or late fall (October–November). This gives you a head start on protection while avoiding harsh winter weather or peak pest seasons. Pro tip: If you’re planting new trees in summer, install the guard immediately to deter gnawing.
Will mesh tree guards work for all types of pests?
Mesh guards are most effective against small to medium-sized pests like rabbits, squirrels, and voles. However, they’re not designed to stop larger animals (e.g., deer or bears) or climbing pests like beavers. For those, consider heavier-duty hardware cloth or additional barriers like fencing. Pair your guard with deterrents like cayenne pepper for extra defense!
How tall should my mesh tree guard be?
The height depends on your tree’s species and local pests. For most young trees, a 4–6 foot guard is ideal—tall enough to cover the trunk and lower branches where pests gnaw. For fast-growing trees or areas with determined chewers (like deer), extend it to 8 feet. Always bury the bottom 6–12 inches to block digging pests.
Can I reuse a mesh tree guard from last year?
Reusing is possible, but check for tears, rust, or pest damage first. Clean it with soapy water and disinfect if needed (e.g., 10% bleach solution). However, if the mesh is stretched or degraded, replace it—pests will exploit gaps! Store old guards in a dry place to extend their lifespan for next season.
Are there alternatives to mesh tree guards?
Yes! If mesh isn’t your style, try:
- Tree wraps (e.g., spiral wraps) for trunk protection
- Repellents (like predator urine or hot pepper spray)
- Physical barriers (e.g., chicken wire wrapped tightly)
- Companion planting (e.g., marigolds or garlic to deter pests)
My tree guard is torn—can I patch it temporarily?
Use duct tape or heavy-duty repair tape to seal small tears immediately. For larger holes, fold over a piece of mesh and secure it with zip ties or staples. Replace the guard ASAP—pests will exploit weak spots in days. Keep a spare roll handy for emergencies!
Wrapping up and next steps
Protecting your young trees from pests like rabbits, deer, and rodents doesn’t have to be a battle—it can be a simple, natural solution! With a mesh tree guard, you’re giving your saplings the best chance to grow strong and healthy without harsh chemicals.
This eco-friendly method is cost-effective, reusable, and a win for both your garden and wildlife.
Ready to take action? Start by gathering your materials and follow the steps to create your own guard today. Your trees—and future shade—will thank you! 🌱💚