
Propagation
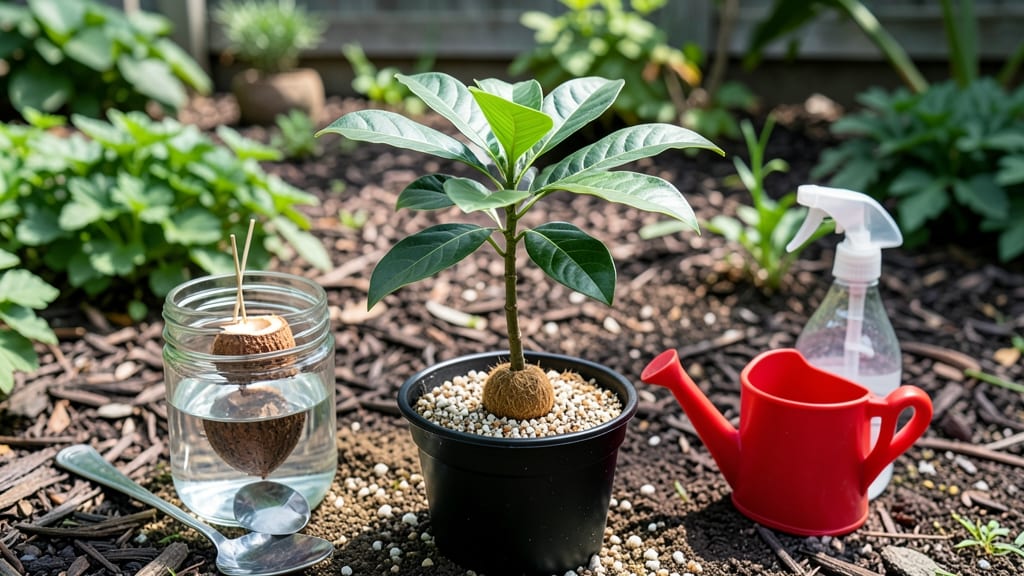
Your kitchen countertop could soon be home to a fast-growing avocado tree—no green thumb required. 🌱 The secret to sprouting an avocado pit lies in patience, a glass of water, and a few simple tricks that cut germination time by weeks.
I’ve watched my own pit develop roots in just 4-6 weeks (instead of the usual 8-12) using these exact methods. The process starts with your avocado pit: clean it thoroughly, then suspend it in water so only the bottom third dips.
Change the water every 2-3 days to prevent mold, and place it in bright, indirect light. Within days, you’ll spot tiny white roots—this is where the magic happens. Once roots reach 3-4 inches, it’s time to transplant into soil.
Use a well-draining mix and keep the soil moist (not soggy) while the tree adjusts. The first leaves will appear in 4-6 weeks, signaling your tree is thriving. Just avoid overwatering—the #1 killer of young avocado trees. This method works in any home, from apartments to sunrooms.
The key is consistency: light, fresh water, and a little extra humidity (try a plastic bag over the pot at first). Ready to grow your own? Let’s get started!
📚 In This Guide
- What you need
- Instructions
- Tips and common mistakes
- Wrapping up and next steps
What you need
- ● 1 fresh avocado pit – Choose one with a smooth, unblemished surface (no cracks or mold). Pro tip: 💡 Rinse it gently to remove any fruit residue before starting.
- ● Toothpicks (3–4) – Standard wooden toothpicks (or small skewers) to suspend the pit.
- ○ 1 clear glass or jar – A wide-mouthed container (16–24 oz) with straight sides works best. Optional: A glass with measurement markings helps track water levels.
- ● Water – Room-temperature, filtered water (chlorine-free if possible). Change it every 2–3 days to prevent bacteria.
- ● Paper towels or coffee filters – A few sheets to cover the pit (keeps it moist without drowning it).
- ● Pencil or pen – For labeling your glass (e.g., "Avocado Tree – Planting Date").
- ● Small pebbles or marbles – Place a few at the bottom of the glass to elevate the pit slightly (improves drainage).
- ● Planting pot (4–6 inches wide) – A drainage hole is a must! Use a lightweight potting mix (50% peat/50% perlite or coco coir).
- ● Grow lights or sunny windowsill – A south-facing window (6+ hours of light/day) or a small LED grow bulb speeds up growth.
- ● Humidity dome or plastic wrap – Creates a mini greenhouse effect for faster germination (remove once sprouts appear).
- ● Fertilizer (balanced, diluted) – Wait until the tree has 3–4 true leaves before introducing fertilizer (e.g., fish emulsion or compost tea).
Step-by-step instructions for growing an avocado tree from a pit
Here's the straightforward method I've used to coax roots from pits in just 3-4 weeks—no fancy tools needed.
🌱 Step 1: Select and Prepare the Avocado Pit
Start with a fresh avocado pit—never dried or store-bought—since they've lost too much moisture. Rinse it thoroughly to remove any remaining fruit, then scrub gently with a soft brush to remove the slimy outer coating. This coating contains natural fungicides that can slow root growth, so removing it gives your pit a better chance.
Next, insert 3-4 toothpicks evenly around the pit's middle, spacing them about ½ inch apart. These will suspend the pit above water without letting it touch the surface. I like to use toothpicks because they're sturdy enough to hold the pit steady while allowing roots to grow downward freely. If you don't have toothpicks, clean wooden skewers work just as well.
💧 Step 2: Suspend the Pit in Water
Fill a small glass or jar with room-temperature water—about 2-3 inches deep—and place the toothpicked pit so the bottom half (the wider end) is submerged while the top half stays dry. Change the water every 2-3 days to prevent bacterial growth and keep it fresh. You'll know it's time when the water looks cloudy or smells funky.
Position the jar in a bright, indirect light spot—like a kitchen windowsill—where temperatures stay between 65-75°F. Direct sunlight can overheat the water and stress the pit. Watch for tiny white bumps along the submerged edges after 7-10 days—these are the first signs of root formation. Real talk: If nothing happens after 3 weeks, your pit might be too old or damaged. Start fresh with a new one.
☀️ Step 3: Encourage Root Growth with Light and Patience
Once roots reach about 2 inches long, it's time to give them more support. Transfer the pit to a small container (like a 6-inch pot) filled with well-draining potting mix. I like to mix 50% potting soil with 50% perlite to keep the roots from sitting in soggy conditions. Make a small hole in the center and gently place the pit so the roots are buried, but the top half remains exposed—this mimics its natural growth pattern.
Water lightly until you see moisture seep from the bottom, then let the top inch of soil dry out before watering again. Place the pot in bright, indirect light (a south-facing window works best) and maintain 70-75°F temperatures. You'll notice new leaves emerging from the top in 4-6 weeks—that's your signal the tree is thriving. Here's the thing—if the soil stays too wet, the roots will rot. Stick your finger in the soil: if it's damp but not soaked, you're golden.
🪴 Step 4: Transplant and Care for the Young Sapling
When your avocado tree grows 6-8 inches tall and develops 3-4 true leaves, it's ready for its first transplant. Choose a 7-8 inch pot with drainage holes and fill it with well-draining cactus/succulent mix—avocado trees hate soggy roots. Gently remove the pit from its original container, tease apart any tangled roots, and place it in the new pot at the same depth it was growing before.
Water thoroughly after transplanting, then let the soil dry out between waterings. Move the pot to a sunny spot (6+ hours of light daily) and keep temperatures between 65-80°F. You'll see faster growth once the roots adjust to their new home. This is also when you can start fertilizing lightly—use a balanced liquid fertilizer (like 10-10-10) diluted to half-strength every 4-6 weeks during spring and summer. Over-fertilizing now will burn delicate roots, so less is more.
Tips & tricks for growing an avocado tree from an avocado pit
Here's what I learned after growing multiple avocado trees from pits—these tricks cut the waiting time and boost success rates.
Pit Selection Matters: Choose pits from organic avocados when possible—they're less likely to have chemical residues that can inhibit root growth. I've found Hass avocado pits work best because they're larger and have more stored energy. If you're using store-bought avocados, opt for the freshest ones you can find, ideally within 24 hours of purchase. The fresher the pit, the better its chances of sprouting.
Water Quality and Temperature: Use filtered or distilled water if possible, as tap water with chlorine or fluoride can stress the developing roots. Stick to room-temperature water—cold water can shock the pit while warm water can accelerate bacterial growth. I've noticed that changing the water every 2-3 days (as instructed) works best when done in the morning to give the pit a full day of fresh oxygen-rich water.
Light Positioning: Place your jar in the brightest spot you have without direct sunlight—east-facing windows are ideal. I've seen roots develop faster when the pit receives indirect light for at least 8 hours a day. If you don't have a suitable window, consider using a grow light on a timer for 12 hours daily. The key is consistent light exposure without the temperature spikes that come with direct sun.
Transplant Timing: Wait until roots reach exactly 2 inches before transplanting—this gives them enough strength to handle the soil transition. When you do transplant, bury the pit slightly deeper than it was in water, about ⅓ of its length. This mimics natural conditions where the top stays exposed to air while roots establish underground. I've found that using a small pot (6-inch) with drainage holes prevents waterlogging, which is the #1 cause of root rot at this stage.
Pro Tips for Growing An Avocado Tree From An Avocado Pit
- Here's what I learned after growing multiple avocado trees from pits—these tricks cut the waiting time and boost success rates.
- Pit Selection Matters: Choose pits from organic avocados when possible—they're less likely to have chemical residues that can inhibit root growth.
- Water Quality and Temperature: Use filtered or distilled water if possible, as tap water with chlorine or fluoride can stress the developing roots.
Frequently asked questions
Got questions about growing an avocado tree from a pit? You’re not alone!
Here are the most common ones—and their practical answers—to help you avoid pitfalls (pun intended) and grow your own avocado tree with confidence.
How long does it take for an avocado pit to sprout?
Patience is key! With the right setup (like toothpicks and water), you’ll typically see roots in 2–6 weeks. Once rooted, the shoot may take another 4–8 weeks to emerge. Keep the water fresh and warm—consistency speeds up the process! Pro tip: If your pit stays dormant, try gently scratching the shell near the top to encourage growth.
Can I plant the pit directly in soil without germinating it first?
Technically yes, but it’s risky. Un-germinated pits often rot or fail to sprout because they lack moisture and oxygen regulation. The toothpick/water method gives roots a fighting chance before soil. If you skip germination, use sterile, well-draining soil and keep it consistently moist (not soggy).
Why did my avocado pit rot instead of sprouting?
Rot is usually caused by too much water, bacteria, or fungus. Always use chlorine-free water (let tap water sit 24 hours) and change it every 2–3 days. If mold appears, rinse the pit and dry it before re-submerging. Bonus: A splash of hydrogen peroxide (1 tsp per cup of water) can prevent rot. Pro tip: Avoid over-tightening toothpicks—roots need room to breathe!
When and how do I transplant the avocado seedling to soil?
Transplant when roots are 2–3 inches long and the shoot is peeking out. Use a small pot (6+ inches) with drainage and well-draining cactus/succulent mix. Bury the pit halfway and water lightly. Keep it in bright, indirect light (no direct sun yet!) and mist leaves to maintain humidity. Gradually introduce sunlight over weeks.
Will my avocado tree grow fruit if I grow it indoors?
Unlikely! Avocado trees need full sun (6+ hours/day), warm climates (USDA zones 9–11), and pollination to fruit. Indoor trees can grow 20+ feet tall but may stay ornamental. For fruit, plant outdoors in a large container or garden once mature (years 3–5). Fun fact: Even if it doesn’t fruit, your tree makes a stunning houseplant! Pro tip: Rotate the pot weekly for even growth.
Can I use any avocado pit, or do I need a special one?
Most store-bought avocado pits will work, but Hass variety (the most common) has the best success rate. Avoid pits from organic or unripe avocados—they may be underdeveloped. Rinse the pit thoroughly to remove residue, then let it dry before germinating. Warning: Some pits are treated to prevent sprouting—check for freshness!
Wrapping up and next steps
Growing an avocado tree from a pit is a rewarding journey that blends patience with the joy of nurturing life! 🌱 With the right techniques—like using toothpicks for stability, keeping your seedling warm, and providing consistent care—you’ll soon witness those first roots and leaves sprout.
Remember, even if your tree grows slowly, every tiny step is progress toward a thriving plant that could one day bear fruit.
Now that you’re armed with germination tricks for faster root growth, why not take the next step? Share your progress with fellow plant enthusiasts online, experiment with different soil mixes, or even gift your seedling to a friend! Happy growing—your green thumb is about to shine brighter than ever! 🌟