
Pruning
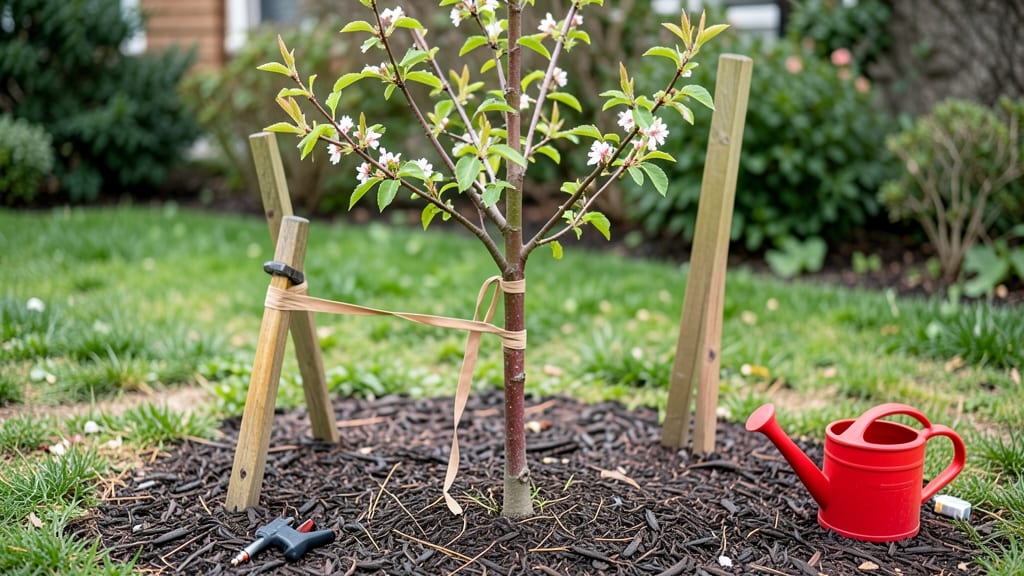
Staking a tree with just two stakes transforms floppy saplings into sturdy giants—without the risk of girdling or stunted growth. 🌳 I learned the hard way when my first windstorm snapped a newly planted oak because the stakes were too loose.
The secret lies in positioning them at a 45-degree angle, 18-24 inches from the trunk, and using soft ties that let the tree sway slightly.
You’ll need two 6-foot wooden or metal stakes, wide fabric strips (or old T-shirts), and a mallet to drive them deep enough to stay put.
The stakes should form a triangle with the tree’s trunk, creating a natural support system that mimics how trees grow in the wild—just with extra reinforcement for your first few years. When done right, your tree will grow straighter and stronger, with roots anchoring deeper into the soil.
The ties should be snug enough to prevent leaning but loose enough to allow natural movement—think of it like a gentle hug rather than a straitjacket. I check mine every few weeks to adjust as the tree grows.
Remove the stakes after 2-3 years (or when the tree can stand alone in a strong gust). The goal isn’t to coddle the tree forever—it’s to give it the confidence to stand tall on its own. Now, let’s get those stakes in the ground!
📚 In This Guide
- What you need
- Instructions
- Tips and common mistakes
- Wrapping up and next steps
What you need
- ● 2 Tree Stakes: Made of galvanized steel or untreated wood (to prevent rust or rot)
- ● Length: 4–6 feet tall (adjust based on tree height)
- ● Diameter: 1–2 inches (thick enough for stability)
- ● Tree Tie or Soft Ropes: Material: Jute, polypropylene, or wide fabric strips (avoid wire—it can damage bark)
- ● Quantity: 2–3 ties per stake (or enough to secure loosely)
- ● Shovel or Auger: For digging 6–12 inches deep holes (depending on soil type)
- ● Gloves: Garden gloves (to protect hands from dirt and splinters)
- ● Tree guard or plastic wrap (to protect the trunk from rubbing)
- ● Stake anchors or T-posts (for extra wind resistance in stormy areas)
- ● Measuring tape (to ensure stakes are placed at the right angle)
- ● Mulch (to improve soil health around the base)
Step-by-step instructions for staking a tree with 2 stakes
Here's my go-to method for giving young trees the support they need without smothering their natural strength.
🪴 Step 1: Choose the Right Stakes and Location
Use two 4-6 foot long wooden or metal stakes—avoid plastic, which can degrade in sunlight. Drive them into the ground at a 45-degree angle, about 12-18 inches from the tree trunk on opposite sides. The top of the stakes should be level with the tree's highest branches to create a stable triangle when tied.
I always place the stakes on the windward side of the tree (the direction prevailing winds come from). This prevents the tree from leaning into the wind while giving the stakes maximum leverage. If your tree is in a sheltered spot, position them perpendicular to the most common breeze direction instead.
🌱 Step 2: Attach the Stakes with Soft Ties
Use wide, stretchy tree ties (like rubberized fabric or soft nylon strips) to connect the tree trunk to each stake. Wrap the tie around the trunk first, then loop it around the stake and pull snug—but not tight. You should be able to fit two fingers between the tie and the trunk. Too tight restricts growth; too loose won't provide support.
I make two ties per stake: one at the base of the trunk and another 12-18 inches higher. This creates a crisscross support system that prevents the tree from rocking. Here's the thing—never tie directly to the bark. Always wrap the tie around a soft pad or piece of fabric to prevent bark damage as the tree grows.
☀️ Step 3: Check and Adjust Regularly
Inspect the stakes and ties every 4-6 weeks during the growing season. Trees grow surprisingly fast, and what felt snug last month may now be too tight. Adjust the ties to maintain that two-finger gap while keeping the tree upright. If the tree starts leaning, gently guide it back into place and tighten the ties slightly.
Watch for signs of strain: if the ties cut into the bark or the tree trunk shows white rings where the tie presses, loosen immediately. I also check that the stakes haven't sunk into the ground—if they've shifted, dig them deeper to maintain that 45-degree angle. The goal is to support the tree, not strangle it.
⏰ Step 4: Remove Stakes When the Tree Stands Alone
Most young trees need staking for 1-2 years, but some strong varieties may only need support for a season. You'll know it's time to remove the stakes when the tree can stand firm in a gentle breeze without leaning. I do a simple test: push the trunk gently at the base—if it doesn't wobble, it's ready.
Remove the ties first, then pull the stakes straight out to avoid damaging roots. Don't saw them off—you'll need to dig carefully to prevent uprooting. I mark the planting date on the trunk with a paint pen so I don't forget when to check for stake removal. Real talk: I've left stakes in too long before, and the tree grows a permanent lean that's hard to correct later.
Tips & tricks for perfect tree staking
Between us, these small details make all the difference between a tree that thrives and one that fights its supports. Let me share what I've learned from years of trial and error.
Stake Placement Precision: The 45-degree angle and 12-18 inch distance from the trunk aren't arbitrary—they create the strongest triangle of support. For taller trees, extend the stakes higher to match the tree's height, but never above the highest branches. This prevents the tree from becoming top-heavy and toppling. I've seen trees lean dramatically when stakes were too short or placed too close.
Tie Tension Test: That two-finger gap between the tie and trunk is your golden rule. Too tight and you'll girdle the tree (cutting into the bark), too loose and the tree will rock. I test tension by trying to slide my fingers between the tie and trunk—if it's snugger than that, loosen immediately. Think of it like a seatbelt: secure enough to protect, but not restrictive.
Windward Wisdom: If you're unsure which direction is windward, do a quick test: hold a lightweight object (like a leaf) near the tree and watch which way it blows. Position your stakes to counter that direction. In sheltered spots, I've found placing stakes perpendicular to the most common breeze works just as well—just observe which way your neighbors' flags or yard decorations lean.
Growth Checkpoints: The 4-6 week inspections aren't just about the ties—they're about the tree's progress. Look for new growth at the inspection points; if the tree has outgrown its supports, it's time to adjust. I've seen trees grow so fast they nearly snapped their own ties. Mark your calendar with seasonal reminders—spring and early summer are critical growth periods.
Pro Tips for Stake A Tree With 2 Stakes
- Between us, these small details make all the difference between a tree that thrives and one that fights its supports....
- Stake Placement Precision: The 45-degree angle and 12-18 inch distance from the trunk aren't arbitrary—they create th...
- Tie Tension Test: That two-finger gap between the tie and trunk is your golden rule. Too tight and you'll girdle the ...
Frequently asked questions
Got questions about staking your tree with just two stakes?
You’re not alone! Here are answers to the most common concerns—so you can tackle this task with confidence.
How deep should the stakes go into the ground?
Stakes should be buried about 1/3 of their length (e.g., 18–24 inches for a 3-foot stake). This ensures stability without restricting root growth. Angle them slightly outward from the tree trunk to create a tripod effect with the tree’s natural lean.
When is the best time to stake a newly planted tree?
Stake your tree immediately after planting to prevent wind damage, but avoid staking permanent stakes for more than 1–2 years. For young trees (under 2 years old), check stakes monthly—they may need tightening as the tree grows or soil settles.
What if my tree keeps leaning even with stakes?
If the tree persists in leaning, check for uneven stake tension or a root flare buried too deep. Loosen the ties slightly, adjust the stakes to guide growth upright, or add a third temporary stake for extra support until roots stabilize (usually 6–12 months).
Can I reuse stakes from last year’s tree?
Reusing stakes is fine if they’re still sturdy and rust-free, but inspect them for cracks or splinters first. Replace any that show signs of rot or bending. Pro tip: Soak new wooden stakes in water for 24 hours before use to prevent them from drawing moisture from the soil.
Are there alternatives to traditional stakes?
Yes! For lightweight trees, try tree ties with a single stake or a spiral stake (a coiled wire that unwinds as the tree grows). Heavy trees may need burlap wraps or fabric supports instead of stakes. Always avoid metal ties—they can girdle the trunk as it thickens.
Wrapping up and next steps
Staking a tree with just two stakes is a simple yet effective way to give your young tree the support it needs to grow strong and straight.
By following these steps—choosing the right materials, positioning the stakes correctly, and securing the tree gently—you’re setting it up for a healthy, sturdy future. 🌱
Now that you’re ready to take action, grab your tools and get staking! Keep an eye on your tree’s progress, and don’t forget to adjust the stakes as it grows. Your efforts will pay off with a thriving, resilient tree for years to come.