
Planting
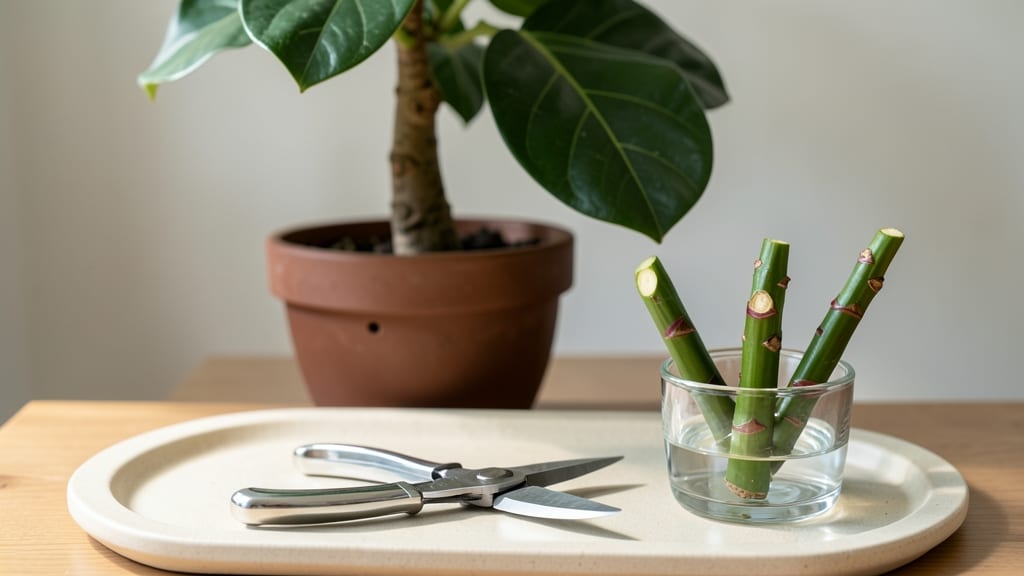
Cutting a rubber tree plant isn’t just about shaping—it's about unlocking stronger growth and thicker stems. 🌿 I learned this the hard way after over-pruning my first one, leaving it looking sad and leggy. The secret lies in strategic cuts that encourage new branches while keeping the plant healthy.
You’ll need sharp pruning shears (sterilized with rubbing alcohol), a small container for water if propagating, and rooting hormone for extra insurance. Timing matters too: spring or early summer gives your rubber tree the best chance to recover and grow back lush before winter dormancy.
Start by removing dead or yellowing leaves at the base of the stem—this clears the way for fresh growth. For shaping, cut just above a leaf node (the bump where new leaves emerge) at a slight angle. Each cut should be clean, not torn, to prevent disease.
After pruning, place cuttings in water or moist soil with rooting hormone to propagate new plants. Within 4-6 weeks, you’ll see roots forming, and your original plant will reward you with bushier foliage. Just avoid overdoing it—rubber trees bounce back, but patience is key for that perfect, sturdy shape.
📚 In This Guide
- What you need
- Instructions
- Tips and common mistakes
- Wrapping up and next steps
What you need
- ● Sharp pruning shears or bypass pruners – Choose sterilized, high-quality shears (e.g., blank">Felco F-2 or blank">Gonicc) with a 4-6 inch blade for clean cuts.
- ● Rubbing alcohol (70% isopropyl) or hydrogen peroxide (3%) – 1 small bottle to sterilize tools before/after cuts.
- ○ Pruning saw (optional but helpful) – For thicker stems (½ inch+ diameter); a blank">Fiskars X27 is a great pick.
- ● Garden gloves (nitrile or latex) – 1 pair to protect hands from sap (latex can irritate skin!).
- ● Sealing wax or pruning sealant – Small container (e.g., blank">Tanglefoot Tree Wound Pruning Seal) to coat large cuts and prevent disease.
- ● Disposable plastic bags or bucket – To collect pruned branches for composting or disposal.
- ● Timing: Prune in spring or early summer (avoid winter—rubber trees are dormant!).
- ● Healthy plant check: Ensure your tree is free of pests/diseases (e.g., spider mites, fungal spots). Quarantine if needed!
- ● Lighting: Work in bright, indirect light—rubber trees are sensitive to harsh sun.
- ● Water access: Have a spray bottle or watering can nearby to mist cut surfaces (helps reduce stress).
- ● Rooting hormone – If propagating from cuttings, use a gel or powder (e.g., Dyna-Gro) to boost success.
- ● Small trowel – For digging if you’re also repotting after pruning.
- ● Plant food (balanced fertilizer, 10-10-10) – Apply 2-4 weeks post-pruning to support regrowth.
- ● Camera or notebook – To document your tree’s shape before/after for future reference!
How to prune a rubber tree plant for healthier growth
Here's the straightforward method I use to keep rubber plants lush and encourage new growth—no guesswork involved.
✂️ Step 1: Gather Your Tools and Choose the Right Time
You only need two things: a sharp pair of pruning shears (sterilized with rubbing alcohol) and a clean cloth for wiping sap. Never use dull scissors—they crush stems instead of making clean cuts. The best time to prune is late winter or early spring, just as new growth begins. This gives your rubber tree time to recover before summer heat stress.
Rubber trees (Ficus elastica) are forgiving, but timing matters. If you prune in summer, the plant may struggle to heal before the next growth cycle. Watch for new leaf buds forming at the stem nodes—this is your signal that the plant is ready. I always prune mine in February when my home stays cool and humid, mimicking the tree's natural dormancy period.
✂️ Step 2: Identify and Remove Dead or Damaged Growth
Start by inspecting your rubber tree for yellow, brown, or mushy leaves—these are dead and won't recover. Use your shears to cut ½ inch above a leaf node (the bump where leaves attach to the stem). Never leave stubs; they attract pests and rot. For severely damaged branches, cut all the way back to a healthy node or the main stem.
Here's the thing—rubber trees often grow leggy when they don't get enough light. If you see bare stems with leaves only at the top, you'll need to prune those long stems back to encourage bushier growth. Make your cuts just above a leaf node at a 45-degree angle—this helps water run off and prevents rot. Wipe any milky sap with your cloth immediately; it's sticky and can damage furniture.
✂️ Step 3: Shape the Plant and Encourage Fullness
Now for the fun part: shaping. Decide whether you want your rubber tree to stay tall and slender or grow bushy. For a bushier look, cut back one-third of the longest stems to a leaf node. This triggers the plant to send out new shoots from dormant buds. I like to aim for a rounded silhouette, so I trim stems that grow too close together to improve airflow and reduce disease risk.
If your rubber tree has become top-heavy, prune the topmost leaves to encourage growth lower on the stem. You'll notice new leaves emerging from nodes below the cut within 4-6 weeks. Avoid over-pruning—never remove more than one-third of the plant's foliage at once. Rubber trees are resilient, but drastic cuts shock the plant and can lead to leaf drop.
💧 Step 4: Care for Your Pruned Plant
After pruning, your rubber tree will need extra care to recover. Water lightly for the first week—just enough to keep the soil slightly moist. Overwatering now can cause root rot, especially since the plant is focusing energy on healing cuts. Place the tree in bright, indirect light (no direct sun for 7-10 days) to reduce stress.
You'll see the first signs of recovery when new leaf buds swell and turn green. This usually happens within 2-3 weeks. To boost growth, feed your plant with a balanced liquid fertilizer (diluted to half strength) 4 weeks after pruning. Avoid fertilizing immediately—pruned plants need time to redirect energy to new growth before taking in extra nutrients.
⏰ Step 5: Monitor and Maintain Growth
Keep an eye on your rubber tree for the next month. Healthy new growth should appear as small, dark green leaves emerging from the nodes where you made cuts. If you notice yellowing leaves on the remaining stems, it's usually a sign of overwatering or low light—adjust your care routine accordingly.
Once your rubber tree has recovered, you can prune it once a year to maintain its shape. I like to do a light trim in late summer to remove any leggy growth before winter. Regular pruning keeps your plant compact, encourages fullness, and prevents it from becoming top-heavy. With consistent care, your rubber tree will stay vibrant and continue growing for years.
Tips & tricks for pruning your rubber tree like a pro
Real talk: Pruning a rubber tree might seem intimidating, but these tricks will help you avoid common pitfalls and get results that look like you've been doing this for years.
Tool Prep Matters: Sterilizing your pruning shears with rubbing alcohol isn't just about cleanliness—it prevents disease transfer between cuts. I also like to sharpen my shears before each session; dull blades tear stems instead of making clean cuts, which stresses the plant. A quick test: If the blade doesn't slice through a piece of paper cleanly, it needs sharpening.
The February Rule: While late winter/early spring is ideal, February specifically works best for most indoor rubber trees because it mimics the natural dormancy period. If you missed February, don't panic—just wait until you see new leaf buds forming at the stem nodes. These buds are your green light to prune, signaling the plant is ready for growth stimulation.
Cutting Angle Technique: That 45-degree angle above the leaf node isn't arbitrary—it helps rainwater run off the cut instead of pooling and causing rot. For thicker stems, make the angle more pronounced. And here's what nobody tells you: If you're pruning a particularly large branch, make your cut just outside the branch collar (the swollen area where the branch meets the stem) to ensure proper healing.
Sap Management: Rubber tree sap is more than just sticky—it can damage surfaces and attract pests if left to dry. I keep a damp paper towel handy to wipe up sap immediately after each cut. For stubborn sap on your tools or furniture, a little dish soap and warm water works wonders. The cleaner you keep things, the healthier your plant will be during recovery.
Pro Tips for Cutting A Rubber Tree Plant
- Real talk: Pruning a rubber tree might seem intimidating, but these tricks will help you avoid common pitfalls and ge...
- Tool Prep Matters: Sterilizing your pruning shears with rubbing alcohol isn't just about cleanliness—it prevents dise...
- The February Rule: While late winter/early spring is ideal, February specifically works best for most indoor rubber t...
Frequently asked questions
Got questions about cutting your rubber tree plant? You’re not alone!
Here are the most common queries—plus expert answers—to help you prune like a pro.
1. When is the best time to cut a rubber tree plant?
The ideal time is late winter or early spring (just before new growth starts). Avoid pruning in fall or winter when the plant is dormant—it can stress the tree. For indoor rubber trees, prune anytime except during extreme weather changes.
2. How much can I cut off without harming the plant?
Never remove more than 1/3 of the plant’s foliage in one session. For rubber trees, focus on dead, yellowing, or overcrowded branches. Heavy pruning (like topping) should be done gradually over 2–3 years to avoid shock.
3. What if my rubber tree bleeds latex after cutting?
Latex bleeding is normal! It seals cuts naturally but can look messy. Wipe it away with a damp cloth. To minimize sap, use sharp, sterile tools and cut at a 45-degree angle just above a leaf node. Seal large cuts with pruning sealant if needed.
4. Can I propagate my rubber tree from cuttings?
Take 4–6 inch cuttings from healthy stems, remove lower leaves, and dip in rooting hormone. Plant in moist perlite or sand, then cover with a plastic bag to retain humidity. Roots typically form in 4–8 weeks with warmth and indirect light.
5. Why does my rubber tree grow unevenly after pruning?
Uneven growth often means light imbalance or over-pruning. Rotate the plant quarter-turns weekly for even sunlight. If growth is sparse, fertilize lightly with a balanced liquid fertilizer (20-20-20) every 6–8 weeks in spring/summer.
Still stumped? Drop your rubber tree pruning questions below—we’ve got answers!
Wrapping up and next steps
Cutting a rubber tree plant is your secret weapon for fostering healthier, lusher growth—and you’ve got all the tools to succeed! 🌱 By mastering pruning techniques, timing, and aftercare, you’re not just trimming branches; you’re shaping a thriving, resilient plant.
Whether you’re a beginner or a seasoned gardener, every snip brings you closer to a stunning rubber tree that’ll be the envy of your garden.
Ready to put your new skills to work? Grab those shears and start pruning! Monitor your tree’s progress, adjust as needed, and soon, you’ll be rewarded with vibrant new leaves and robust branches. Happy gardening—your rubber tree’s future starts today! ✂️💚